

Vinyl Cutting Course - Certification
Course
- source_url: https://ambitious.academy/course/vinyl-cutting-course-certification
- dump Date: 2026-08-21 (academy.jsonl Last-Modified Fri, 21 Aug 2026 09:25:14 GMT; fetched_at_utc 2026-08-21T10:42:48Z = 12:42 SAST)
- export post_date: 2025-10-27 14:13:01
- post_author: 28
- post_status: publish
- post_excerpt: (empty)
- post_parent: 0
- comment_status: open
- comment_count: 0
- course_expire_enrollment: 0
- course_type: paid
- course_product_id: 4762
- course_download_id: 0
- course_max_students: 0
- course_language: (empty)
- course_difficulty_level: intermediate
- course_benefits: (empty)
-
course_requirements: Vinyl Cutting Course Completion
-
course_audience: (empty)
- course_materials: (empty)
- is_enabled_course_qa: 1
- is_enabled_course_announcements: 1
- course_certificate_id: 2471
- is_disabled_course_review: 1
- rcp_membership_levels: []
- course_enable_certificate: (empty)
- edd_price: (empty)
- regular_price: 25
- sale_price: (empty)
- course_duration: 0 hours, 0 minutes, 0 seconds (raw [0,0,0])
- course_intro_video kind: none
- course_intro_video raw: []
- catalog Title: Vinyl Cutting Course - Certification
- catalog url: https://ambitious.academy/course/vinyl-cutting-course-certification
- content merge: export HTML and jsonl catalog text differ — academy.jsonl dump (2026-08-21) is newer than export post_date; both kept in full. Older export kept as history below; catalog kept as dump text.
Curriculum
Curriculum sections (from course_curriculum):
- section: Information
- section: Examinations
Curriculum topics (id / name / type) in export order:
- id 74 · lesson · About
- id 76 · lesson · How to Follow
- id 4424 · quiz · Theory Exam (60min)
- id 168 · lesson · Practical Exam
- id 75 · lesson · Assessment and Results
Raw course_curriculum (export, kept in full):
[{"title":"Information","content":"","topics":[{"id":74,"name":"About","type":"lesson"},{"id":76,"name":"How to Follow","type":"lesson"}]},{"title":"Examinations","content":"In this section you will find they theory based and practical based examinations.\nYou will have to pass both in order to receive certification.","topics":[{"id":4424,"name":"Theory Exam (60min)","type":"quiz"},{"id":168,"name":"Practical Exam","type":"lesson"},{"id":75,"name":"Assessment and Results","type":"lesson"}]}]
Course content (academy.jsonl catalog)
dump Date 2026-08-21 (academy.jsonl Last-Modified Fri, 21 Aug 2026 09:25:14 GMT; fetched_at_utc 2026-08-21T10:42:48Z = 12:42 SAST). Public visit link is source_url (paywall).
About Your Professional Vinyl Certification Exam
Welcome! This is your final step toward becoming a professionally recognized vinyl cutting specialist. This external exam is designed to rigorously test and officially validate the comprehensive skills you gained during the Vinyl Cutting Course.
What This Exam Is About
This is a Professional Competency Assessment. Its purpose is to verify your mastery of the entire vinyl cutting process, from digital design and machine operation to flawless application, certifying that you meet the high standards required for industry work. Successful completion of this exam will earn you your official certification credential.
Exam Requirements
Vinyl Cutting Course Completion
Before proceeding, you must have successfully completed all modules, knowledge checks, and the final Demo Project within the Vinyl Cutting Course.
This course provides the specific theoretical knowledge and practical workflows necessary to pass this exam.
Exam Coverage and Structure
The certification exam is divided into two weighted parts:
- Theory Assessment (Theory) This section consists of multiple-choice and short-answer questions designed to test your foundational knowledge. It will cover:
Materials Tools: Understanding the proper uses and differences between vinyl types, and the function of application tools (squeegees, weeding hooks). Machine Operation: Knowledge of essential cutter settings, including Blade Height, Force/Pressure, and Velocity/Speed. Software Workflows: Proficiency in file types, scaling, and preparation techniques in VinylCut 5 (e.g., mirroring for interior application, welding paths). Application Best Practices: Knowing ideal applications, surface preparation, and troubleshooting issues like air bubbles or lifting.
- Practical Assessment (Practical) This section is a full-cycle simulation that requires you to execute and submit documented proof of your work. You will be given a specific digital client brief and must:
Simulate the Full Workflow: Go from making the design, through scaling and weeding. Demonstrate Application Technique: Execute a successful, bubble-free application of the decal onto a specified surface (e.g., a window or rigid substrate) using the Hinge Method. Documentation: Submit high-quality photographs or a video demonstrating adherence to the exact specifications of the practical brief.
Good luck! Your professional credentials await .
Course content (export post_content)
History from export post_date 2025-10-27 14:13:01. Full HTML converted; nothing summarized.
**

**
**About Your Professional Vinyl Certification Exam **
Welcome! This is your final step toward becoming a professionally recognized vinyl cutting specialist. This external exam is designed to rigorously test and officially validate the comprehensive skills you gained during the Vinyl Cutting Course.
What This Exam Is About
This is a Professional Competency Assessment. Its purpose is to verify your mastery of the entire vinyl cutting process, from digital design and machine operation to flawless application, certifying that you meet the high standards required for industry work. Successful completion of this exam will earn you your official certification credential.
Exam Requirements
Vinyl Cutting Course Completion
Before proceeding, you must have successfully completed all modules, knowledge checks, and the final Demo Project within the Vinyl Cutting Course.
This course provides the specific theoretical knowledge and practical workflows necessary to pass this exam.
Exam Coverage and Structure
The certification exam is divided into two weighted parts:
**

**
**1. Theory Assessment (Theory) **
This section consists of multiple-choice and short-answer questions designed to test your foundational knowledge. It will cover:
- Materials & Tools: Understanding the proper uses and differences between vinyl types, and the function of application tools (squeegees, weeding hooks).
- Machine Operation: Knowledge of essential cutter settings, including Blade Height, Force/Pressure, and Velocity/Speed.
- Software Workflows: Proficiency in file types, scaling, and preparation techniques in VinylCut 5 (e.g., mirroring for interior application, welding paths).
- Application Best Practices: Knowing ideal applications, surface preparation, and troubleshooting issues like air bubbles or lifting.
**

**
**2. Practical Assessment (Practical) **
This section is a full-cycle simulation that requires you to execute and submit documented proof of your work. You will be given a specific digital client brief and must:
- Simulate the Full Workflow: Go from making the design, through scaling and weeding.
- Demonstrate Application Technique: Execute a successful, bubble-free application of the decal onto a specified surface (e.g., a window or rigid substrate) using the Hinge Method.
- Documentation: Submit high-quality photographs or a video demonstrating adherence to the exact specifications of the practical brief.
Good luck! Your professional credentials await.
Lessons
Nest order. 4 lessons. Overlapping titles kept as separate lessons. HTML converted in full, not summarized.
1. About
- title: About
- status: publish
- author: 0
- is_previewable: (empty)
- video_duration: 0h 0m 0s (raw {"hours":0,"minutes":0,"seconds":0})
- video_source_type: (empty)
**
**
About Your Professional Vinyl Certification Exam
Welcome! This is your final step toward becoming a professionally recognized vinyl cutting specialist. This external exam is designed to rigorously test and officially validate the comprehensive skills you gained during the Vinyl Cutting Course.
What This Exam Is About
This is a Professional Competency Assessment. Its purpose is to verify your mastery of the entire vinyl cutting process, from digital design and machine operation to flawless application, certifying that you meet the high standards required for industry work. Successful completion of this exam will earn you your official certification credential.
Exam Requirements
Vinyl Cutting Course Completion
Before proceeding, you must have successfully completed all modules, knowledge checks, and the final Demo Project within the Vinyl Cutting Course.
This course provides the specific theoretical knowledge and practical workflows necessary to pass this exam. Attempting this certification without having finished the course materials is strongly discouraged.
Exam Coverage and Structure
The certification exam is divided into two weighted parts:
**
**
**1. Theory Assessment (Theory) **
This section consists of multiple-choice and short-answer questions designed to test your foundational knowledge. It will cover:
- Materials & Tools: Understanding the proper uses and differences between vinyl types, and the function of application tools (squeegees, weeding hooks).
- Machine Operation: Knowledge of essential cutter settings, including Blade Height, Force/Pressure, and Velocity/Speed.
- Software Workflows: Proficiency in file types, scaling, and preparation techniques in VinylCut 5 (e.g., mirroring for interior application, welding paths).
- Application Best Practices: Knowing ideal applications, surface preparation, and troubleshooting issues like air bubbles or lifting.
**
**
**2. Practical Assessment (Practical) **
This section is a full-cycle simulation that requires you to execute and submit documented proof of your work. You will be given a specific digital client brief and must:
- Simulate the Full Workflow: Go from making the design, through scaling and weeding.
- Demonstrate Application Technique: Execute a successful, bubble-free application of the decal onto a specified surface (e.g., a window or rigid substrate) using the Hinge Method.
- Documentation: Submit high-quality photographs or a video demonstrating adherence to the exact specifications of the practical brief.
Good luck! Your professional credentials await.
2. How to Follow
- title: How to Follow
- status: publish
- author: 0
- is_previewable: (empty)
- video_duration: 0h 0m 0s (raw {"hours":0,"minutes":0,"seconds":0})
- video_source_type: (empty)
In this section we will be looking at some important things for a student to bear in mind throughout the exams.
Progression
- If you have completed a lesson and it was not automatically marked as complete, you will have you mark it manually as completed.
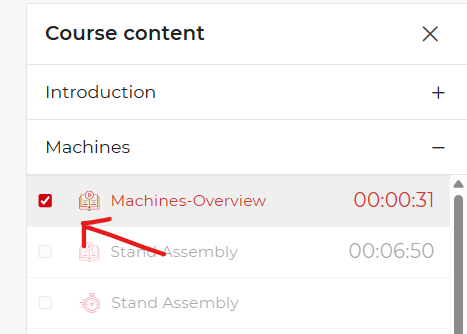
Attempts
- If you fail the exams you are able to try again, but we would recommend that you first recap using the Online Vinyl Cutter Course training materials.
Q&A
- If you have any questions that needs answers, please leave them below this lesson in the Q&A section.
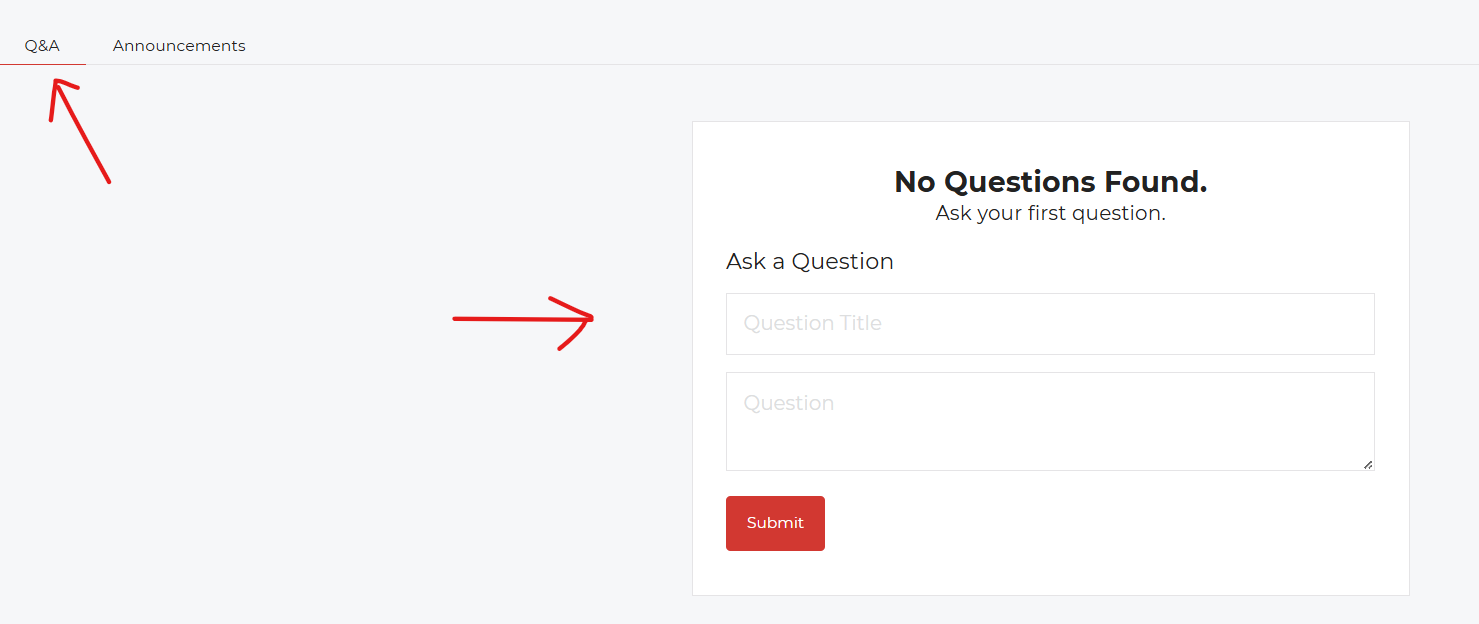
- Keep questions relevant to the lesson at hand.
-
Before leaving a question, ensure that a similar question has not been asked and answered already.
-
quizzes_following_this_lesson: 1 (full text in Quizzes)
- Theory Exam (60min) (25 questions)
3. Practical Exam
- title: Practical Exam
- status: publish
- author: 0
- is_previewable: (empty)
- video_duration: 0h 0m 0s (raw {"hours":0,"minutes":0,"seconds":0})
- video_source_type: (empty)
Exam Practical: Single or Muli-color Business Decal
This project challenges you to execute a complete, single or muli-colored vinyl cutting job from client file preparation to final installation, mimicking a common order for a small business or vehicle graphic.
The Client Brief
A hypothetical client, "The Local Grind Coffee Shop," has requested a new decal for their front window.
| Specification | Detail |
|---|---|
| Final Application Surface | A flat, non-porous surface (e.g., store window, vehicle window, or a smooth plastic/acrylic sign board). |
| Vinyl Type | single or muli-color Adhesive Vinyl. |
| Dimensions | 45 cm wide. Height will be determined by design proportionality. |
| Design File | (You will provide a simple, single or muli-color vector image file for "The Local Grind." The design should include both text and a basic icon.) |
| Key Skill Tested | The ability to make a vector design, correct sizes, prepare it for cutting, and successfully apply it using the Wet or Dry Hinge Method. |
Project Workflow: Step-by-Step Challenge
Your final submission will be a photo/video demonstrating the finished, applied decal. Follow these steps precisely:
Phase 1: Setup and File Preparation (Software)
- Design: Make a vector design in VinylCut 5. Verify that the design consists of clean, closed vector paths and is ready for cutting (no internal raster images).
- Scale and Mirror:
- Scale the entire design to the required 45 cm width.
- Since this is a window graphic often viewed from the outside, decide if the client intends for it to be installed on the interior (must be cut in reverse/mirrored) or on the exterior (cut normally). Make and justify your choice.
- Optimize the Cut: Set the correct blade height, force, and speed based on your specific machine and the permanent adhesive vinyl you are using.
Phase 2: Cutting and Weeding (Machine & Tools)
- Load Material: Load your roll or sheet of vinyl into your machine. Ensure it is aligned correctly to prevent tracking errors during the cut.
- Execute the Cut: Send the job to your machine. Monitor the cut to ensure the blade cleanly penetrates the vinyl layer but does not cut through the backing paper (a "kiss cut").
- Weeding: Use your weeding tool (hook, tweezers, etc.) to meticulously remove all excess vinyl material (the "negative space") from around the design, leaving only the required text and logo components attached to the backing paper.
- Application Tape: Apply the transfer tape smoothly over your weeded vinyl design, removing any air pockets with your squeegee. This prepares the decal for transfer.
Phase 3: Final Application (Surface & Technique)
- Surface Prep: Choose your final application surface (Window, plastic, etc.). Thoroughly clean and dry the surface using isopropyl alcohol and a lint-free cloth.
- Position and Hinge: Measure and mark the exact placement location on your surface. Use the Hinge Method to secure and align the decal perfectly before committing to the full stick.
- Application: Using your squeegee, apply the vinyl to the surface by working from the hinge outward, applying firm and even pressure to adhere the vinyl and eliminate air bubbles. If you chose the Wet Method, apply your soapy water solution before this step.
- Transfer Tape Removal: Slowly and carefully peel the transfer tape back against itself at a 180-degree angle. If any part of the decal lifts, stop, repress it, and continue.
Submission Checklist
Successful completion of the Demo Project requires you to demonstrate mastery of the full workflow. Your submission should include:
- A brief written summary detailing your material choices (vinyl type, color) and confirming your decision on whether you cut the image mirrored or not.
- A high-quality photo of the completed Applied Decal on your chosen surface.
Submission Instructions:
Complete any write-ups, screenshots or videos then submit via email to the instructor at info@ambitious.co.za.
Good luck! This project is the final step toward turning your knowledge into a professional skill.
4. Assessment and Results
- title: Assessment and Results
- status: publish
- author: 0
- is_previewable: (empty)
- video_duration: 0h 0m 0s (raw {"hours":0,"minutes":0,"seconds":0})
- video_source_type: (empty)
**

**
Exam Assessment and Results
Thank you for completing the Professional Vinyl Certification Exam!
Please be aware that your exam submission-particularly the Practical Assessment-requires manual review by a certified instructor.
What Happens Next:
- Instructor Review: An instructor will thoroughly evaluate your theoretical answers and your submitted documentation (photos/video) for the practical component to ensure all specifications were met.
- Assessment Timeframe: Review and grading typically take 5-10 business days from the time of submission.
- Notification: Once the assessment is complete, you will be notified with your final score and, upon passing, your official certification credentials.
We appreciate your patience during this review process. Congratulations on taking this final step!
Quizzes
1 quizzes in nest order, each under the lesson it followed. Every question and every answer is kept, including answer_is_correct.
After lesson: How to Follow
Quiz: Theory Exam (60min)
- follows_lesson: How to Follow
- quiz_content: Answer the following questions based on the course materials.
- quiz_time: 60
- quiz_time_unit: minutes
- quiz_hide_time: (empty)
- quiz_feedback_mode: retry
- quiz_passing_grade: 80
- quiz_max_attempts_allowed: 0
- quiz_questions_order: rand
- quiz_hide_question_number: (empty)
- quiz_questions_layout: (empty)
- quiz_explanation_enabled: (empty)
- quiz_skip_question_showing: (empty)
- question_count: 25
Question 1: After Application
- question_type: singleChoice
- question_points: 1.00
- question_status: publish
- question_display_points: 1
- question_answer_required: 1
- question_randomize: (empty)
- question_order: 0
- question_negative_score: 0.00
- question_content: After application, when peeling the transfer tape, what angle is recommended to minimize the chance of lifting the vinyl decal from the surface?
- question_explanation: (empty)
Answers (4):
-
- [incorrect] answer_is_correct=0 · view_format=text · D. 0-degree
-
- [CORRECT] answer_is_correct=1 · view_format=text · C. 180-degree
-
- [incorrect] answer_is_correct=0 · view_format=text · A. 45-degree
-
- [incorrect] answer_is_correct=0 · view_format=text · B. 90-degree
Question 2: Before Vinyl Application
- question_type: singleChoice
- question_points: 1.00
- question_status: publish
- question_display_points: 1
- question_answer_required: 1
- question_randomize: (empty)
- question_order: 0
- question_negative_score: 0.00
- question_content: Before any vinyl application, what is the most important preparatory step for the chosen surface (window, vehicle, wall)?
- question_explanation: (empty)
Answers (4):
-
- [CORRECT] answer_is_correct=1 · view_format=text · C. Thoroughly cleaning the surface to remove all dirt, grease, and oil.
-
- [incorrect] answer_is_correct=0 · view_format=text · B. Applying a coat of wax for protection.
-
- [incorrect] answer_is_correct=0 · view_format=text · D. Sanding the surface smooth.
-
- [incorrect] answer_is_correct=0 · view_format=text · A. Priming the surface with glue.
Question 3: Propper Depth
- question_type: singleChoice
- question_points: 1.00
- question_status: publish
- question_display_points: 1
- question_answer_required: 1
- question_randomize: (empty)
- question_order: 0
- question_negative_score: 0.00
- question_content: A proper depth is achieved when the blade cuts through:
- question_explanation: (empty)
Answers (3):
-
- [incorrect] answer_is_correct=0 · view_format=text · A. The vinyl, adhesive, and backing paper.
-
- [incorrect] answer_is_correct=0 · view_format=text · D. Half the thickness of the vinyl layer.
-
- [CORRECT] answer_is_correct=1 · view_format=text · B. Only the vinyl, leaving the backing paper intact.
Question 4: Curved surface
- question_type: singleChoice
- question_points: 1.00
- question_status: publish
- question_display_points: 1
- question_answer_required: 1
- question_randomize: (empty)
- question_order: 0
- question_negative_score: 0.00
- question_content: When applying vinyl lettering to a significantly curved surface (like a car bumper), what is a key technique to make the vinyl more pliable and conformable?
- question_explanation: (empty)
Answers (4):
-
- [incorrect] answer_is_correct=0 · view_format=text · D. Using only removable vinyl.
-
- [CORRECT] answer_is_correct=1 · view_format=text · C. Gently warming the vinyl with a heat gun or hair dryer.
-
- [incorrect] answer_is_correct=0 · view_format=text · B. Cutting small relief slits into the lettering itself.
-
- [incorrect] answer_is_correct=0 · view_format=text · A. Applying a heavy amount of water.
Question 5: Blade Cuts
- question_type: singleChoice
- question_points: 1.00
- question_status: publish
- question_display_points: 1
- question_answer_required: 1
- question_randomize: (empty)
- question_order: 0
- question_negative_score: 0.00
- question_content: If the blade cuts completely through both the vinyl and the backing paper, what setting should be reduced?
- question_explanation: (empty)
Answers (4):
-
- [incorrect] answer_is_correct=0 · view_format=text · D. Acceleration.
-
- [incorrect] answer_is_correct=0 · view_format=text · A. Speed.
-
- [CORRECT] answer_is_correct=1 · view_format=text · B. Force
-
- [incorrect] answer_is_correct=0 · view_format=text · C. Offset.
Question 6: Machine Part
- question_type: singleChoice
- question_points: 1.00
- question_status: publish
- question_display_points: 1
- question_answer_required: 1
- question_randomize: (empty)
- question_order: 0
- question_negative_score: 0.00
- question_content: What part of the cutting machine holds the blade and rotates to allow the blade to follow the vector path?
- question_explanation: (empty)
Answers (4):
-
- [incorrect] answer_is_correct=0 · view_format=text · D. The Control Panel.
-
- [CORRECT] answer_is_correct=1 · view_format=text · C. The Blade Holder (or Carriage).
-
- [incorrect] answer_is_correct=0 · view_format=text · A. The Tracking Wheel.
-
- [incorrect] answer_is_correct=0 · view_format=text · B. The Pinch Roller.
Question 7: Material Sandwich
- question_type: singleChoice
- question_points: 1.00
- question_status: publish
- question_display_points: 1
- question_answer_required: 1
- question_randomize: (empty)
- question_order: 0
- question_negative_score: 0.00
- question_content: Which layer of the vinyl decal "sandwich" is removed first during the Hinge Method application?
- question_explanation: (empty)
Answers (3):
-
- [incorrect] answer_is_correct=0 · view_format=text · A. The Transfer Tape.
-
- [incorrect] answer_is_correct=0 · view_format=text · B. The Vinyl Decal.
-
- [CORRECT] answer_is_correct=1 · view_format=text · C. The Backing Paper (Release Liner).
Question 8: Trapped Bubbles
- question_type: singleChoice
- question_points: 1.00
- question_status: publish
- question_display_points: 1
- question_answer_required: 1
- question_randomize: (empty)
- question_order: 0
- question_negative_score: 0.00
- question_content: If you encounter trapped bubbles after the application is complete, what is the best repair technique for minor bubbles?
- question_explanation: (empty)
Answers (4):
-
- [CORRECT] answer_is_correct=1 · view_format=text · B. Prick the bubble with a sharp, fine needle (pinhole) and press the air out.
-
- [incorrect] answer_is_correct=0 · view_format=text · D. Apply a heavy weight on the bubble overnight.
-
- [incorrect] answer_is_correct=0 · view_format=text · C. Use a blow torch to melt the bubble.
-
- [incorrect] answer_is_correct=0 · view_format=text · A. Peel the whole decal off and start over.
Question 9: Unwanted Vinyl
- question_type: singleChoice
- question_points: 1.00
- question_status: publish
- question_display_points: 1
- question_answer_required: 1
- question_randomize: (empty)
- question_order: 0
- question_negative_score: 0.00
- question_content: The process of removing all unwanted vinyl material from around and inside the cut design is called:
- question_explanation: (empty)
Answers (4):
-
- [incorrect] answer_is_correct=0 · view_format=text · B. Masking.
-
- [incorrect] answer_is_correct=0 · view_format=text · D. Offsetting.
-
- [CORRECT] answer_is_correct=1 · view_format=text · C. Weeding.
-
- [incorrect] answer_is_correct=0 · view_format=text · A. Calendering.
Question 10: Essential Preparation
- question_type: singleChoice
- question_points: 1.00
- question_status: publish
- question_display_points: 1
- question_answer_required: 1
- question_randomize: (empty)
- question_order: 0
- question_negative_score: 0.00
- question_content: What essential preparation step must be taken in VinylCut 5 for a decal that is intended for application on the interior side of a window (to be read correctly from the outside)?
- question_explanation: (empty)
Answers (4):
-
- [CORRECT] answer_is_correct=1 · view_format=text · B. Mirror (or flip horizontally) the entire design.
-
- [incorrect] answer_is_correct=0 · view_format=text · D. Increase the cut resolution.
-
- [incorrect] answer_is_correct=0 · view_format=text · C. Weld all overlapping paths.
-
- [incorrect] answer_is_correct=0 · view_format=text · A. Change the vinyl color to white.
Question 11: Industry Term
- question_type: singleChoice
- question_points: 1.00
- question_status: publish
- question_display_points: 1
- question_answer_required: 1
- question_randomize: (empty)
- question_order: 0
- question_negative_score: 0.00
- question_content: What is the standard industry term for the layer that is placed over the weeded design to hold all the pieces in place during application?
- question_explanation: (empty)
Answers (4):
-
- [incorrect] answer_is_correct=0 · view_format=text · D. Backing Substrate.
-
- [CORRECT] answer_is_correct=1 · view_format=text · B. Application Tape / Transfer Tape.
-
- [incorrect] answer_is_correct=0 · view_format=text · A. Release Liner.
-
- [incorrect] answer_is_correct=0 · view_format=text · C. Protective Film.
Question 12: Material Irregularity
- question_type: singleChoice
- question_points: 1.00
- question_status: publish
- question_display_points: 1
- question_answer_required: 1
- question_randomize: (empty)
- question_order: 0
- question_negative_score: 0.00
- question_content: If your cut lines are jagged or start and stop incorrectly, what is the most likely machine issue?
- question_explanation: (empty)
Answers (4):
-
- [incorrect] answer_is_correct=0 · view_format=text · A. The blade offset is set too low.
-
- [CORRECT] answer_is_correct=1 · view_format=text · B. The vinyl material is slipping due to improperly set pinch rollers.
-
- [incorrect] answer_is_correct=0 · view_format=text · D. The vinyl is too old.
-
- [incorrect] answer_is_correct=0 · view_format=text · C. The cutting force is too high.
Question 13: File Format
- question_type: singleChoice
- question_points: 1.00
- question_status: publish
- question_display_points: 1
- question_answer_required: 1
- question_randomize: (empty)
- question_order: 0
- question_negative_score: 0.00
- question_content: Which file format is generally the most reliable for scaling without losing quality and is preferred for vinyl cutting?
- question_explanation: (empty)
Answers (4):
-
- [incorrect] answer_is_correct=0 · view_format=text · A. JPEG
-
- [incorrect] answer_is_correct=0 · view_format=text · B. PNG.
-
- [CORRECT] answer_is_correct=1 · view_format=text · SVG or EPS (Vector formats).
-
- [incorrect] answer_is_correct=0 · view_format=text · D. GIF.
Question 14: Primarily Application Tool
- question_type: singleChoice
- question_points: 1.00
- question_status: publish
- question_display_points: 1
- question_answer_required: 1
- question_randomize: (empty)
- question_order: 0
- question_negative_score: 0.00
- question_content: Which tool is primarily used to adhere the vinyl to the final substrate and push out trapped air or water?
- question_explanation: (empty)
Answers (4):
-
- [CORRECT] answer_is_correct=1 · view_format=text · B. Squeegee.
-
- [incorrect] answer_is_correct=0 · view_format=text · A. Weeding Hook.
-
- [incorrect] answer_is_correct=0 · view_format=text · C. Utility Knife.
-
- [incorrect] answer_is_correct=0 · view_format=text · D. Measuring Tape.
Question 15: Application Techniques
- question_type: singleChoice
- question_points: 1.00
- question_status: publish
- question_display_points: 1
- question_answer_required: 1
- question_randomize: (empty)
- question_order: 0
- question_negative_score: 0.00
- question_content: The Hinge Method ensures:
- question_explanation: (empty)
Answers (4):
-
- [CORRECT] answer_is_correct=1 · view_format=text · A. Precise and straight alignment before the vinyl commits to the surface.
-
- [incorrect] answer_is_correct=0 · view_format=text · B. The vinyl shrinks less over time.
-
- [incorrect] answer_is_correct=0 · view_format=text · D. The decal is removable later.
-
- [incorrect] answer_is_correct=0 · view_format=text · C. Faster drying time for wet application.
Question 16: Freshly Painted Walls
- question_type: singleChoice
- question_points: 1.00
- question_status: publish
- question_display_points: 1
- question_answer_required: 1
- question_randomize: (empty)
- question_order: 0
- question_negative_score: 0.00
- question_content: Why should a freshly painted wall be left to cure for at least two weeks before applying a wall decal?
- question_explanation: (empty)
Answers (4):
-
- [CORRECT] answer_is_correct=1 · view_format=text · C. The paint releases gasses ("off-gassing") that can cause bubbles and adhesion failure under the vinyl.
-
- [incorrect] answer_is_correct=0 · view_format=text · D. It allows time to re-measure the wall.
-
- [incorrect] answer_is_correct=0 · view_format=text · B. The vinyl won't stick to wet paint.
-
- [incorrect] answer_is_correct=0 · view_format=text · A. The paint needs time to harden completely.
Question 17: Precautions
- question_type: singleChoice
- question_points: 1.00
- question_status: publish
- question_display_points: 1
- question_answer_required: 1
- question_randomize: (empty)
- question_order: 0
- question_negative_score: 0.00
- question_content: Before running a large cut job, what is the best practice to ensure your force and offset settings are correct?
- question_explanation: (empty)
Answers (4):
-
- [incorrect] answer_is_correct=0 · view_format=text · A. Run the entire job at a low force setting.
-
- [incorrect] answer_is_correct=0 · view_format=text · D. Increase the cut speed to compensate.
-
- [incorrect] answer_is_correct=0 · view_format=text · C. Manually measure the blade tip with a ruler.
-
- [CORRECT] answer_is_correct=1 · view_format=text · B. Perform a small test cut (test square/circle).
Question 18: Wrinkles
- question_type: singleChoice
- question_points: 1.00
- question_status: publish
- question_display_points: 1
- question_answer_required: 1
- question_randomize: (empty)
- question_order: 0
- question_negative_score: 0.00
- question_content: If a student is applying a large decal using the dry application method and notices wrinkles forming, what should they do immediately?
- question_explanation: (empty)
Answers (4):
-
- [CORRECT] answer_is_correct=1 · view_format=text · B. Stop and gently lift the applied section back up to smooth out the wrinkle before continuing.
-
- [incorrect] answer_is_correct=0 · view_format=text · D. Cut the vinyl at the wrinkle line.
-
- [incorrect] answer_is_correct=0 · view_format=text · C. Apply heat to the wrinkle.
-
- [incorrect] answer_is_correct=0 · view_format=text · A. Continue squeegeeing as quickly as possible.
Question 19: Scaling
- question_type: singleChoice
- question_points: 1.00
- question_status: publish
- question_display_points: 1
- question_answer_required: 1
- question_randomize: (empty)
- question_order: 0
- question_negative_score: 0.00
- question_content: You've imported a client's logo. If you only adjust the width but do not constrain the proportions, what is the result?
- question_explanation: (empty)
Answers (4):
-
- [incorrect] answer_is_correct=0 · view_format=text · D. The cut will take twice as long.
-
- [incorrect] answer_is_correct=0 · view_format=text · A. The software will automatically fix the height.
-
- [incorrect] answer_is_correct=0 · view_format=text · B. The file will be rejected by the cutter.
-
- [CORRECT] answer_is_correct=1 · view_format=text · C. The logo will be stretched or distorted.
Question 20: Overlapping Shapes
- question_type: singleChoice
- question_points: 1.00
- question_status: publish
- question_display_points: 1
- question_answer_required: 1
- question_randomize: (empty)
- question_order: 0
- question_negative_score: 0.00
- question_content: If your design has two overlapping shapes that you want to cut as a single, continuous boundary (eliminating the overlapping interior lines), what software function should you use?
- question_explanation: (empty)
Answers (4):
-
- [incorrect] answer_is_correct=0 · view_format=text · D. Trace Bitmap.
-
- [incorrect] answer_is_correct=0 · view_format=text · B. Group.
-
- [incorrect] answer_is_correct=0 · view_format=text · A. Break Apart.
-
- [CORRECT] answer_is_correct=1 · view_format=text · C. Weld (or Union).
Question 21: Transfer Tape Function
- question_type: singleChoice
- question_points: 1.00
- question_status: publish
- question_display_points: 1
- question_answer_required: 1
- question_randomize: (empty)
- question_order: 0
- question_negative_score: 0.00
- question_content: What is the main function of the Transfer Tape (or Application Tape)?
- question_explanation: (empty)
Answers (4):
-
- [incorrect] answer_is_correct=0 · view_format=text · D. To enhance the vinyl's adhesive properties.
-
- [incorrect] answer_is_correct=0 · view_format=text · A. To protect the vinyl from UV light.
-
- [incorrect] answer_is_correct=0 · view_format=text · B. To make the vinyl itself more durable.
-
- [CORRECT] answer_is_correct=1 · view_format=text · C. To hold the cut and weeded vinyl pieces in their correct alignment during transfer.
Question 22: Wet Application
- question_type: singleChoice
- question_points: 1.00
- question_status: publish
- question_display_points: 1
- question_answer_required: 1
- question_randomize: (empty)
- question_order: 0
- question_negative_score: 0.00
- question_content: When performing a Wet Application on a window, what is the purpose of the mild dish soap added to the water?
- question_explanation: (empty)
Answers (4):
-
- [CORRECT] answer_is_correct=1 · view_format=text · C. To break the surface tension, allowing the decal to slide and be repositioned.
-
- [incorrect] answer_is_correct=0 · view_format=text · A. To clean the surface better.
-
- [incorrect] answer_is_correct=0 · view_format=text · B. To make the vinyl sticky.
-
- [incorrect] answer_is_correct=0 · view_format=text · D. To enhance the color of the vinyl.
Question 23: Weeding Hook or Tweezers
- question_type: singleChoice
- question_points: 1.00
- question_status: publish
- question_display_points: 1
- question_answer_required: 1
- question_randomize: (empty)
- question_order: 0
- question_negative_score: 0.00
- question_content: When should a Weeding Hook or Tweezers be used in the vinyl cutting process?
- question_explanation: (empty)
Answers (4):
-
- [incorrect] answer_is_correct=0 · view_format=text · A. To load the vinyl into the cutter.
-
- [incorrect] answer_is_correct=0 · view_format=text · B. To apply pressure during the final application.
-
- [incorrect] answer_is_correct=0 · view_format=text · D. To cut the vinyl from the roll before loading.
-
- [CORRECT] answer_is_correct=1 · view_format=text · C. To remove the excess vinyl material from the design after cutting.
Question 24: Successful Wet Application
- question_type: singleChoice
- question_points: 1.00
- question_status: publish
- question_display_points: 1
- question_answer_required: 1
- question_randomize: (empty)
- question_order: 0
- question_negative_score: 0.00
- question_content: After a successful wet application, why is it necessary to wait before removing the transfer tape?
- question_explanation: (empty)
Answers (4):
-
- [incorrect] answer_is_correct=0 · view_format=text · A. To give the vinyl a chance to heat up.
-
- [incorrect] answer_is_correct=0 · view_format=text · D. To let the vinyl shrink to its final size.
-
- [CORRECT] answer_is_correct=1 · view_format=text · C. To allow the water/soap solution to evaporate sufficiently so the vinyl adheres to the substrate, not the tape.
-
- [incorrect] answer_is_correct=0 · view_format=text · B. To allow the cut lines to set.
Question 25: Method Recommended
- question_type: singleChoice
- question_points: 1.00
- question_status: publish
- question_display_points: 1
- question_answer_required: 1
- question_randomize: (empty)
- question_order: 0
- question_negative_score: 0.00
- question_content: Which application method is recommended for large, solid graphics on glass to allow for repositioning and easy bubble removal?
- question_explanation: (empty)
Answers (4):
-
- [incorrect] answer_is_correct=0 · view_format=text · A. Dry Application.
-
- [incorrect] answer_is_correct=0 · view_format=text · D. Mechanical Application.
-
- [CORRECT] answer_is_correct=1 · view_format=text · B. Wet Application (using soapy water).
-
- [incorrect] answer_is_correct=0 · view_format=text · C. Heat Application.
Sources
- source_url: https://ambitious.academy/course/vinyl-cutting-course-certification
- source_ref: academy.jsonl (dumps-check; public catalog dump)
- source_ref: nested Course export b72d7de272f4c30d9f4c6640d2ac20ff9ac8aa6376479e9601dcfd04593de203.csv
- source_ref: drive_file_id list: (none in this course export)
- timestamp: 2026-08-21 SAST
- dest (do not write from this pass): T:\V\sources\academy\vinyl-cutting-course-certification.md